All Golden Scapegoat Puzzle Solutions and Locations
♦ Latest: 3.6 Livestream & 3.5 Summary
♦ New 5★: Hysilens & Cerydra
♦ Rerun 5★: Kafka & Silver Wolf
♦ 3.5 Events: The Chrysos Maze Grand Restaurant
└ Old Brews & New Friends
♦ Upcoming: Evernight & Permansor Terrae
Honkai: Star Rail's Golden Scapegoat puzzles are solved by lighting all the altars while avoiding the shadow mimic. See all Warbling Shores Golden Scapegoat locations in Version 3.5 and their solutions in this guide!
List of Contents
Version 3.5 Golden Scapegoats
Warbling Shores Styxia Golden Scapegoat
| Warbling Shores Styxia F1 | Warbling Shores Styxia B1 |
|---|---|
 |
 |
| Warbling Shores Puzzle Solutions | |
| Puzzle 1 | Puzzle 2 |
| Puzzle 3 | Puzzle 4 |
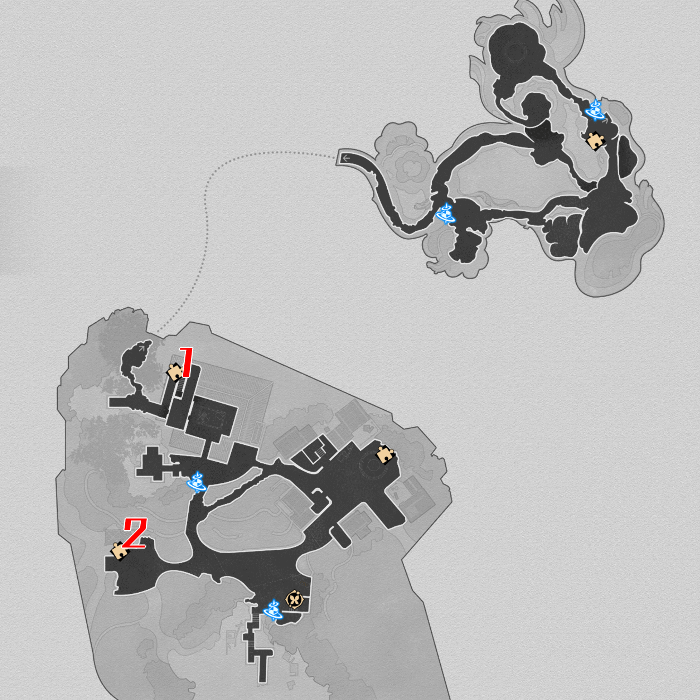
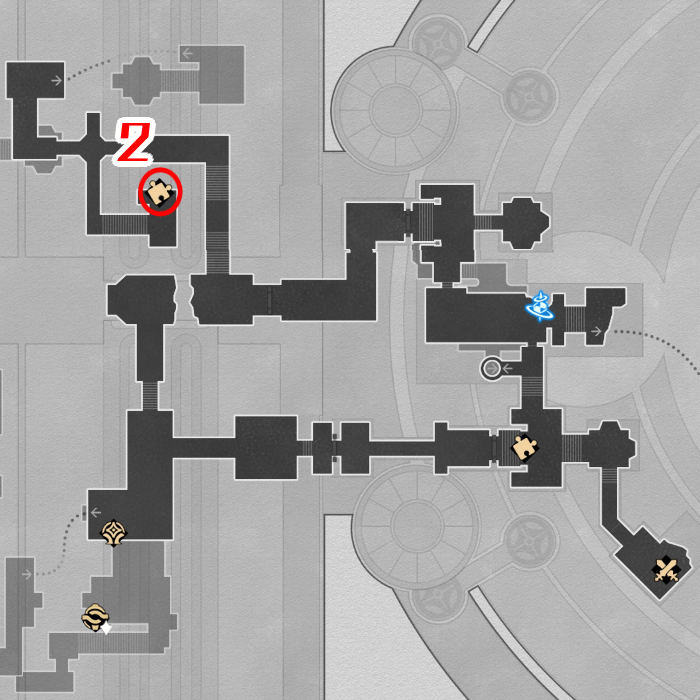
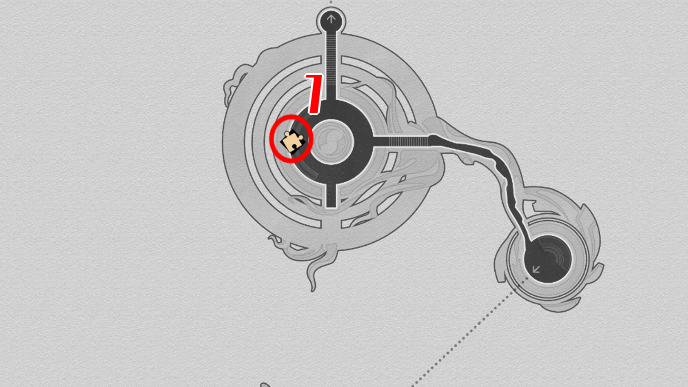
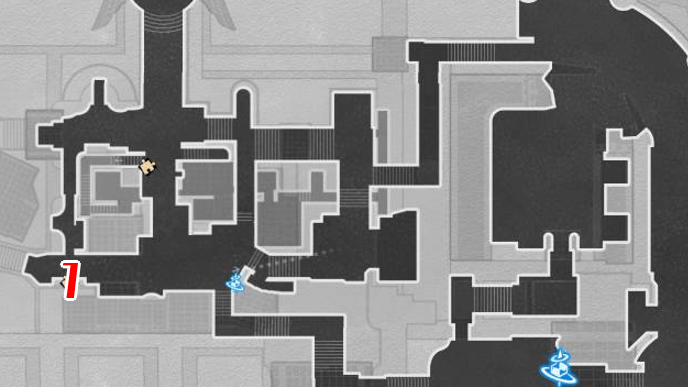
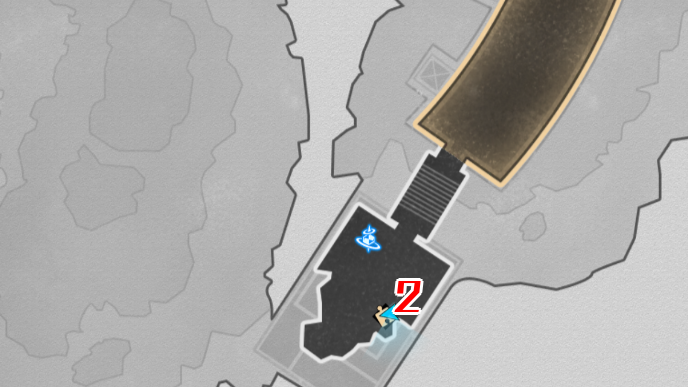
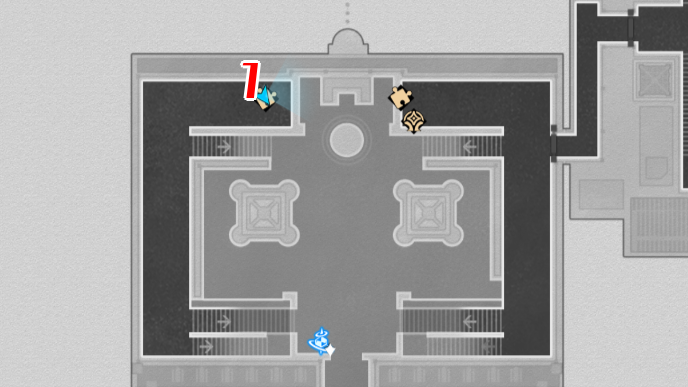
Four Golden Scapegoat puzzles can be found in Warbling Shores of Styxia in Amphoreus. Use the Passage of Treasures Space Anchor and head up the elevator nearby. Go to the left and you'll see the scapegoat at the end of the path.
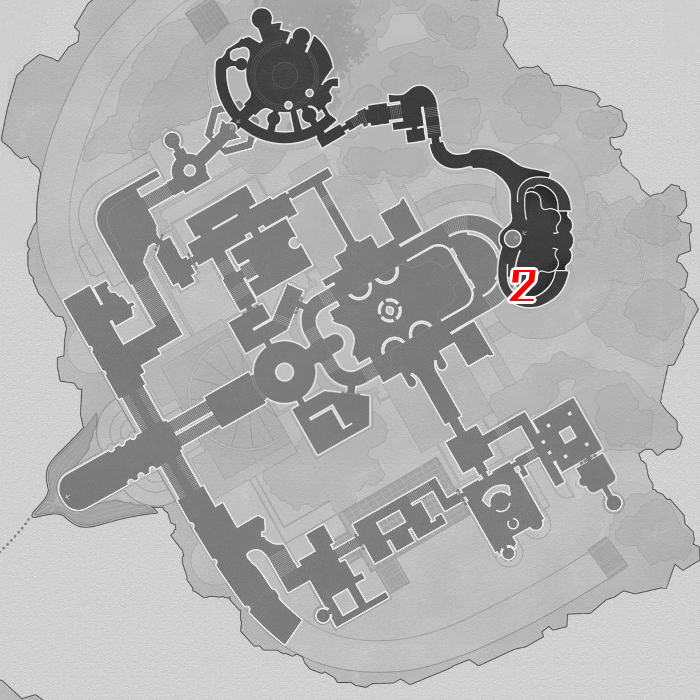
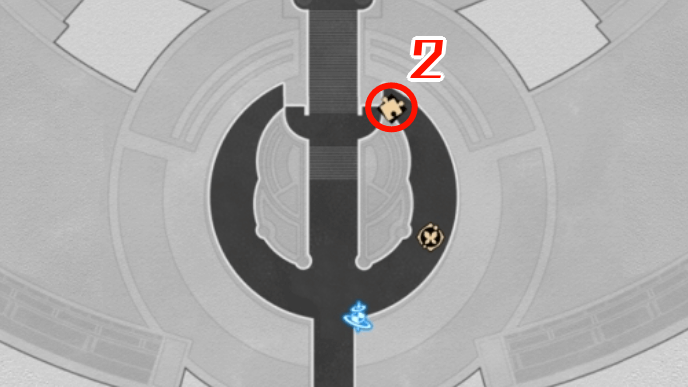
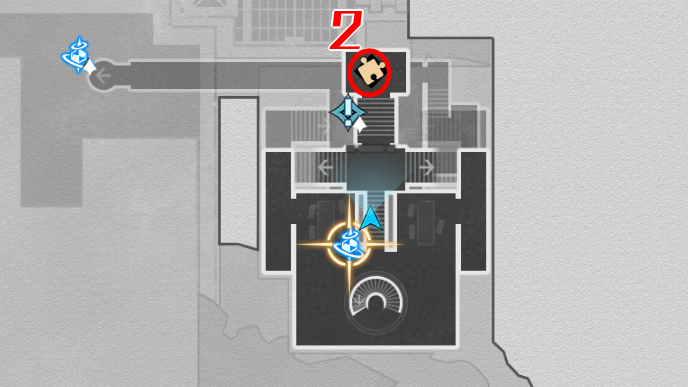
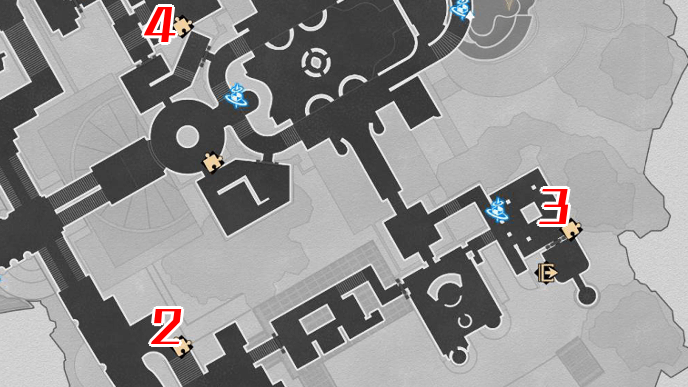
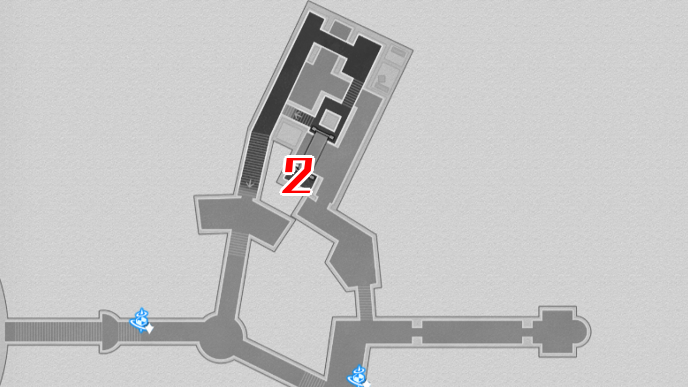
For the second one, use the Ariose Fountain Courtyard Space Anchor and head into the courtyard. Pass through the people and go up another set of stairs to see the scapegoat.
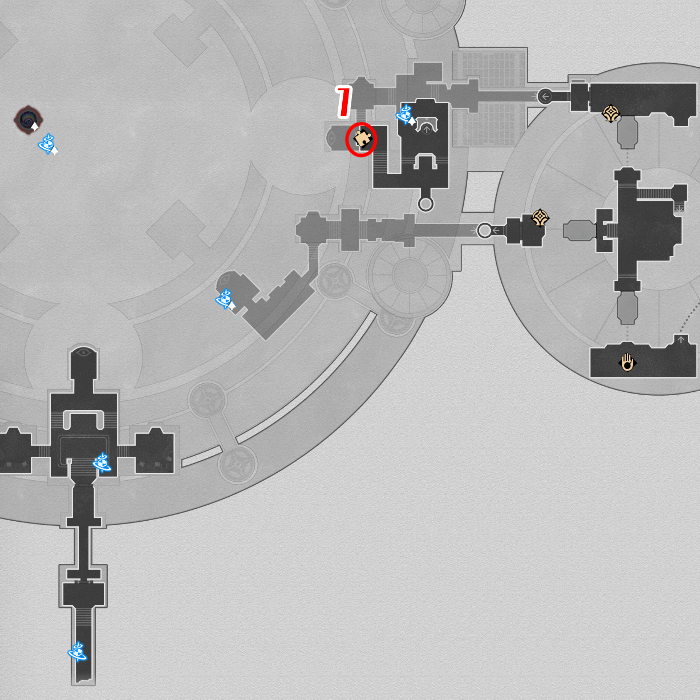
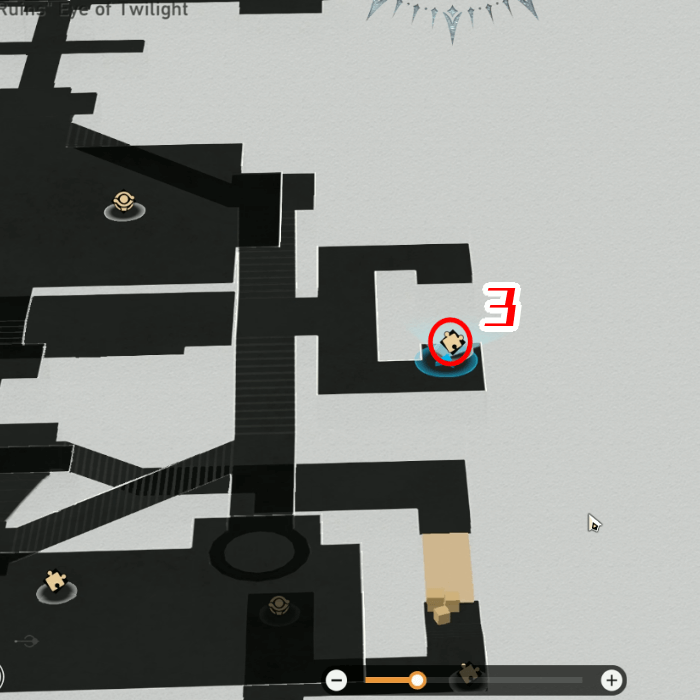
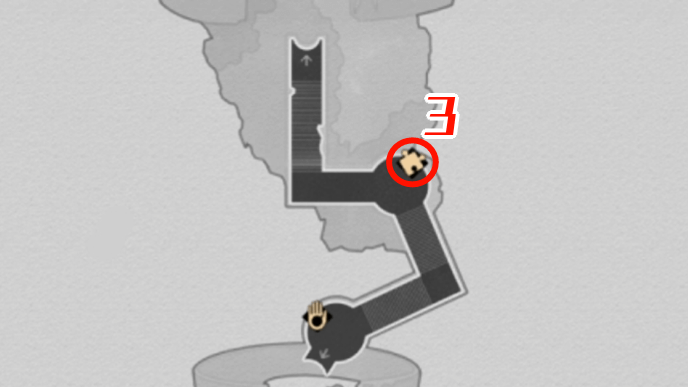
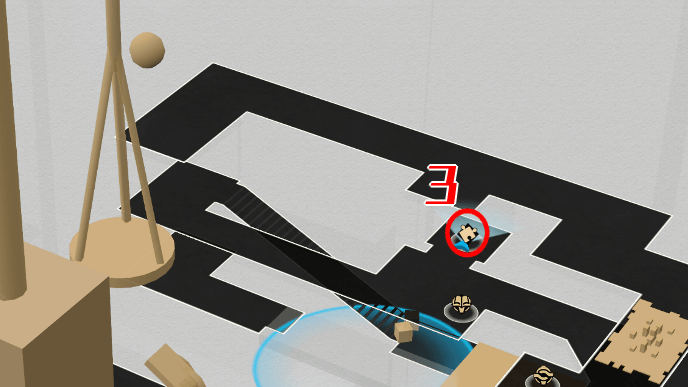
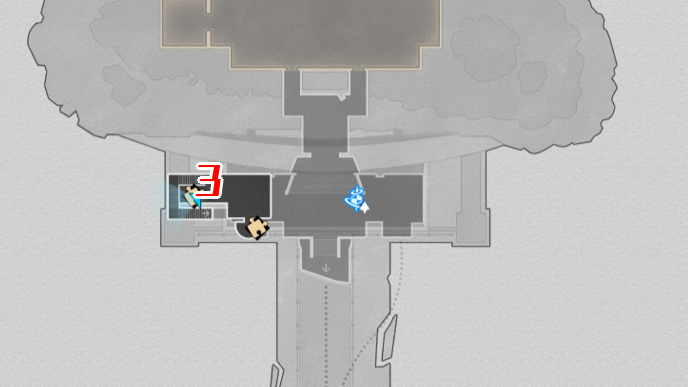
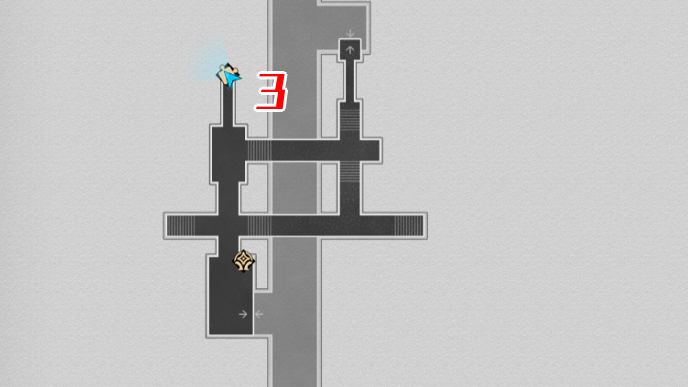
The third scapegoat is located inside the room next to the Passage of Treasures Space Anchor. Once you enter the room, go down the stairs and then use the elevator to get to the second floor. You'll see the scapegoat near a plant.
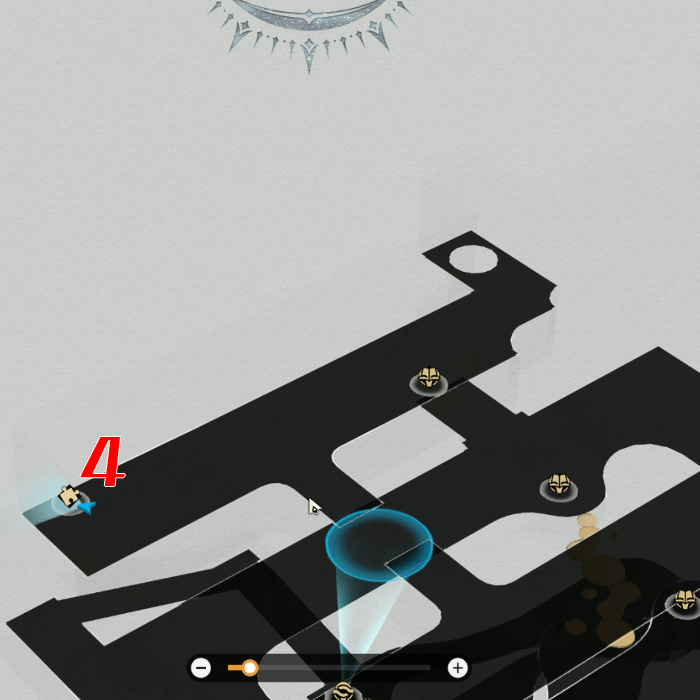
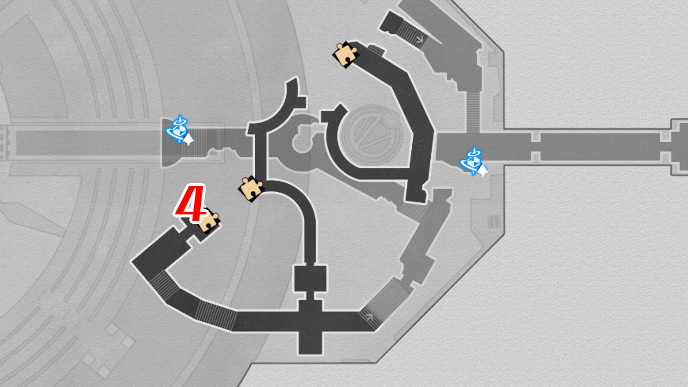
The last scapegoat is located inside the big room in B1. Use the Somber Altar of Candles Space Anchor and make your way to the big room on the left. Go up to the second floor then use the elevator to get to the third floor. Use the Tome of Miracles to shift the time to Evernight and you'll see the scapegoat at the end of the path.
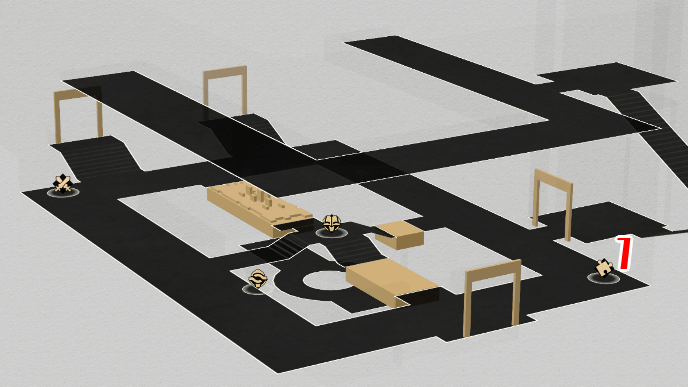
Warbling Shores Golden Scapegoat 1
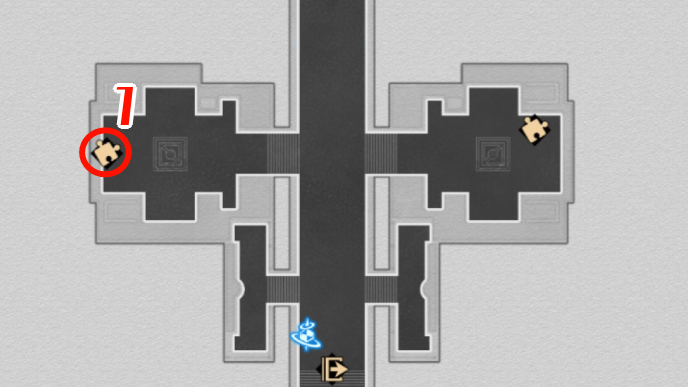
| Warbling Shores Golden Scapegoat 1 Solution |
|---|
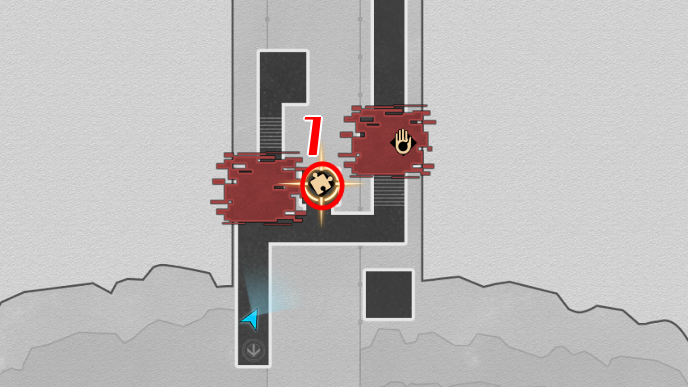
Input the commands: Right, Right. When your past self shows up, head to the right and enter the portal. Next, head to the right again and you'll drop to the platform where the altar is. |
▲ Back to All Warbling Shores Puzzles
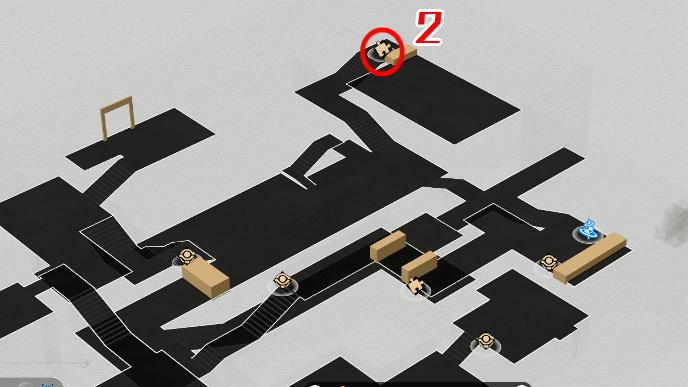
Warbling Shores Golden Scapegoat 2
| Warbling Shores Golden Scapegoat 2 Solution |
|---|
Input the commands: Right, Right, Down, Right, Right, Right. When your past self shows up, climb the ladder on the right and head towards the portal on the left. Enter it and you'll get to the altar. |
▲ Back to All Warbling Shores Puzzles
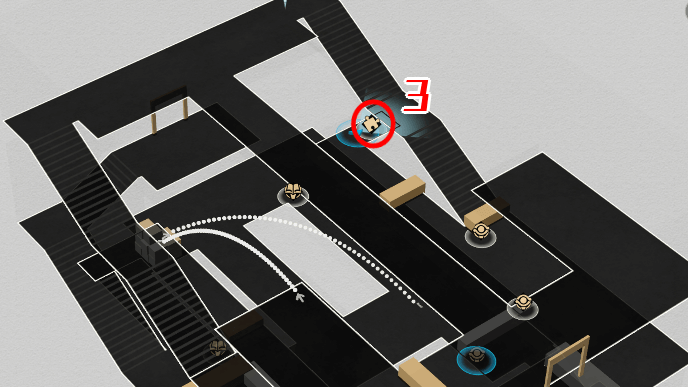
Warbling Shores Golden Scapegoat 3
| Warbling Shores Golden Scapegoat 3 Solution |
|---|
Input the commands: Right, Right, Right, Left, Left, Left. When your past self shows up, step on the button to the right then climb up the ladder to enter the portal. Next, head right and cross the bridge to get to the altar. |
▲ Back to All Warbling Shores Puzzles
Warbling Shores Golden Scapegoat 4
| Warbling Shores Golden Scapegoat 4 Solution |
|---|
Input the commands: Right, Right, Right, Left. When your past self shows up, go to the right and step on the button. When the gap to your right is open, fall down to the altar. |
▲ Back to All Warbling Shores Puzzles
Version 3.4 Golden Scapegoat Puzzles
Aedes Elysiae Golden Scapegoats
| Aedes Elysiae | |
|---|---|
 |
|
| Aedes Elysiae Puzzle Solutions | |
| Puzzle 1 | Puzzle 2 |
Two Golden Scapegoat puzzles can be found in Aedes Elysiae of Amphoreus. Use the Sacrament Courtyard Space Anchor and head into the courtyard. Go to the left and you'll see the scapegoat at the end of the path.
For the second one, use the Voyager's Wharf Space Anchor and head left. You'll see the scapegoat near the tent.
Aedes Elysiae Golden Scapegoat 1
| Aedes Elysiae Golden Scapegoat 1 Solution |
|---|
Input the commands: Left, Left, Down, Up, Down, Left, Right. When your past self shows up, head left to step on the yellow button. Next, head to the right and you'll drop to the altar. |
▲ Back to All Aedes Elysiae Puzzles
Aedes Elysiae Golden Scapegoat 2
| Aedes Elysiae Golden Scapegoat 2 Solution |
|---|
Input the commands: Left, Left, Left, Left, Right, Up, Left. When your past self shows up, climb the ladder then fall on the button again. Next, climb the ladder again but this time go down it after your past self stops. You can then freely fall to the altar. |
▲ Back to All Aedes Elysiae Puzzles
Version 3.3 Golden Scapegoat Puzzles
| Version 3.3 Golden Scapegoat Puzzles | |
|---|---|
| "Fortress of Dome" Eye of Twilight | "Cloudedge Bastion Ruins" Eye of Twilight |
| "Lightless Chapel" Dawncloud | "Fallen Twilight City" Okhema |
Click the links to jump to an area's puzzles!
Fortress of Dome Eye of Twilight Golden Scapegoats
| Fortress of Dome Eye of Twilight F1 | Fortress of Dome Eye of Twilight F2 West |
|---|---|
 |
 |
| Fortress of Dome Eye of Twilight B2 | |
 |
|
| Fortress of Dome Puzzle Solutions | |
| Puzzle 1 | Puzzle 2 |
| Puzzle 3 | |
Three Golden Scapegoat puzzles can be found in Fortress of Dome Eye of Twilight in Amphoreus. Use the Frontier Well Space Anchor in F2 and use the lift to the right to go down to F1. The first Golden Scapegoat can be found on a platform to the right after you exit the lift.
For the second one, use the Arching BoneMech Space Anchor and follow the path to the left until you reach the large room. Get to the other side using the shifting platforms and you'll see the scapegoat between a set of stairs.
Lastly, use a Janus Passage next to a Hand of Zagreus in F1 to go to B1. Then, follow the set of stairs to B2 then use a shifting platform to get to the last puzzle.
▲ Back to Version 3.3 Scapegoat Puzzles
Fortress of Dome Golden Scapegoat 1
| Fortress of Dome Golden Scapegoat 1 Solution |
|---|
Input the commands: Left, Left, Right, Right, Right, Up, Left, Left, Left, Right. When your past self shows up, go all the way to the right and you'll fall to the lower level. Wait for your past self to step on the blue button and then you can head to the altar. |
▲ Back to All Fortress of Dome Puzzles
Fortress of Dome Golden Scapegoat 2
| Fortress of Dome Golden Scapegoat 2 Solution |
|---|
Input the commands: Left, Left, Left, Up, Right, Right, Right, Right. When your past self shows up, go to the right to fall down and then go to the left to climb up the ladders. You can then fall through the gap to reach the altar. |
▲ Back to All Fortress of Dome Puzzles
Fortress of Dome Golden Scapegoat 3
| Fortress of Dome Golden Scapegoat 3 Solution |
|---|
Input the commands: Left, Left, Right, Right, Right, Right, Right. When your past self shows up, wait for it to fall on the button then go up the ladder. Fall through the gap on the upper level and you'll reach the altar. |
▲ Back to All Fortress of Dome Puzzles
Cloudedge Bastion Ruins Eye of Twilight Golden Scapegoats
| Cloudedge Bastion Ruins Eye of Twilight F1 | Cloudedge Bastion Ruins Eye of Twilight F4 |
|---|---|
 |
 |
| Cloudedge Bastion Ruins Eye of Twilight F3 | |
 |
|
| Cloudedge Bastion Ruins Puzzle Solutions | |
| Puzzle 1 | Puzzle 2 |
| Puzzle 3 | |
Three Golden Scapegoat puzzles can be found in Cloudedge Bastion Ruins Eye of Twilight in Amphoreus. Use the Aurous Pool Space Anchor in F1 and go to the right to see the first scapegoat.
For the second one, use the Nightspire BoneMech Space Anchor and follow the path to the left until you reach an intersection. Go down the left stairs and you'll see the second scapegoat.
Lastly, use the Bastion Depth Space Anchor and go to the large room to the right. From here, use the rune to go to the middle platform and to its left, you'll see a set of stairs leading down. Go down and you'll see the last scapegoat near the edge.
▲ Back to Version 3.3 Scapegoat Puzzles
Cloudedge Bastion Ruins Golden Scapegoat 1
| Cloudedge Bastion Ruins Golden Scapegoat 1 Solution |
|---|
Input the commands: Right, Right, Right, Left, Down, Right, Left. When your past self shows up, go all the way to the left and wait for it to step on the blue button. Fall into the gap on the right and you'll get to the altar. |
▲ Back to All Cloudedge Bastion Ruins Puzzles
Cloudedge Bastion Ruins Golden Scapegoat 2
| Cloudedge Bastion Ruins Golden Scapegoat 2 Solution |
|---|
Input the commands: Left, Left, Right, Right, Right, Right, Left. When your past self shows up, go to the left to fall down the gap. Step on the blue button to the left and then head right to fall into another gap. Finally, head left to get to the altar. |
▲ Back to All Cloudedge Bastion Ruins Puzzles
Cloudedge Bastion Ruins Golden Scapegoat 3
| Cloudedge Bastion Ruins Golden Scapegoat 3 Solution |
|---|
Input the commands: Left, Left, Left, Right, Up, Left. When your past self shows up, go up the ladder and head right. Go to the left once you're at the edge and then you'll fall to the altar. |
▲ Back to All Cloudedge Bastion Ruins Puzzles
Lightless Chapel Dawncloud Golden Scapegoats
| Lightless Chapel Dawncloud Center | Lightless Chapel Dawncloud South |
|---|---|
 |
 |
| Lightless Chapel Puzzle Solutions | |
| Puzzle 1 | Puzzle 2 |
| Puzzle 3 | Puzzle 4 |
Three Golden Scapegoat puzzles can be found in Lightless Chapel Dawncloud in Amphoreus. Use the Lightless Chapel Space Anchor and go west to see the first scapegoat.
For the second one, use the Lightless Chapel: Vestibule Space Anchor and follow the path to the right to see the second scapegoat. Lastly, use the Eve's Holy Pass Space Anchor and climb up the stairs to the left. You'll see the last scapegoat near a red shield.
As for the last one, it's actually a hidden Scapegoat which you can find near Eve's Holy Pass Space Anchor and inside the eastern room. You'll only see the secret Golden Scapegoat once you find all the Creation Nymphs in the map. It'll be on the right side corner of the room, surrounded by people.
▲ Back to Version 3.3 Scapegoat Puzzles
Lightless Chapel Golden Scapegoat 1
| Lightless Chapel Golden Scapegoat 1 Solution |
|---|
Input the commands: Right, Right, Right, Right, Left. When your past self shows up, climb up the ladder and wait for it to step on the button. You can then head straight to the altar. |
▲ Back to All Lightless Chapel Puzzles
Lightless Chapel Golden Scapegoat 2
| Lightless Chapel Golden Scapegoat 2 Solution |
|---|
Input the commands: Left, Down, Right, Left, Down, Right, Left. When your past self shows up, wait for it to get on top of the ladder and then make a left. Next, make another left and head straight to the altar. |
▲ Back to All Lightless Chapel Puzzles
Lightless Chapel Golden Scapegoat 3
| Lightless Chapel Golden Scapegoat 3 Solution |
|---|
Input the commands: Left, Down, Right, Right, Right, Left. When your past self shows up, go up the ladder on the left and head straight to the altar. |
▲ Back to All Lightless Chapel Puzzles
Lightless Chapel Golden Scapegoat 4
| Lightless Chapel Golden Scapegoat 4 Solution |
|---|
Input the commands: Left, Left, Left, Right, Right, Right, Right, Right, Right. When your past self shows up, follow it to the left and then go to the right. Once you fall to the lower platform, head left until you reach the leftmost pillar. Climb up and head to the right, then go down once you're below the starting platform. Lastly, go left to reach the altar. Completing this will reward you with the Chirping Secret - The Unseen Steps achievement. |
▲ Back to All Lightless Chapel Puzzles
Fallen Twilight City Okhema Golden Scapegoats
| Fallen Twilight City Okhema F1 Northeast | Fallen Twilight City Okhema F2 Northeast |
|---|---|
 |
 |
| Fallen Twilight City Okhema F2 Southwest | |
 |
|
| Fallen Twilight City Puzzles | |
| Puzzle 1 | Puzzle 2 |
| Puzzle 3 | |
Three Golden Scapegoat puzzles can be found in Fallen Twilight City Okhema in Amphoreus. Use the Mirage Cove Space Anchor and go through the doors, heading west. Once you're outside, you'll see the scapegoat on the red carpet.
For the second one, use the Reverie Bath Space Anchor and to the right you'll see the second scapegoat. Lastly, use the Silent Night's Market Space Anchor and head to the middle path. To the left, you'll see a stairs that lead up to F2. At the end of the path, you'll see the last scapegoat.
▲ Back to Version 3.3 Scapegoat Puzzles
Fallen Twilight City Golden Scapegoat 1
| Fallen Twilight City Golden Scapegoat 1 Solution |
|---|
Input the commands: Right, Right, Left, Left, Up, Right, Right. When your past self shows up, go to the left and fall to the lower level. Wait for your past self to step on the button and head straight to the altar. |
▲ Back to All Fallen Twilight City Puzzles
Fallen Twilight City Golden Scapegoat 2
| Fallen Twilight City Golden Scapegoat 2 Solution |
|---|
Input the commands: Right, Right, Right, Right, Left, Left, Left. When your past self shows up, go to the right and step on the yellow button. Next, go to the left so that your past self steps on the blue button then climb to the altar. |
▲ Back to All Fallen Twilight City Puzzles
Fallen Twilight City Golden Scapegoat 3
| Fallen Twilight City Golden Scapegoat 3 Solution |
|---|
Input the commands: Left, Left, Left, Right, Right, Right, Right, Right. When your past self shows up, go to the right then to the left to step on the buttons. Wait for your past self to step on the blue buttons then head towards the altar. |
▲ Back to All Fallen Twilight City Puzzles
Version 3.2 Golden Scapegoat Puzzles
| Version 3.2 Golden Scapegoat Puzzles | |
|---|---|
| "Demigod Council" Dawncloud | "Dragonbone City" Styxia |
Click the links to jump to an area's puzzles!
Demigod Council Dawncloud Golden Scapegoats
| Demigod Council Dawncloud South | Demigod Council Dawncloud Center |
|---|---|
 |
 |
| Demigod Council Dawncloud North | |
 |
|
| Dawncloud Puzzle Solutions | |
| Puzzle 1 | Puzzle 2 |
| Puzzle 3 | |
Three Golden Scapegoat puzzles can be found in Demigod Council Dawncloud in Amphoreus. Use the Sacred Path of Dawncloud Space Anchor and enter the large room on the left. The first Golden Scapegoat can be found in front of the Living Flame of Georios.
For the second one, use the Demigod Council: Forecourt Space Anchor and turn right towards the direction of the Garmentmaker. Go to the very end to find the Golden Scapegoat.
Lastly, use the Titan Cliff: Entrance Space Anchor again and head north. Use the floating platform on the way to reach the last puzzle.
▲ Back to Version 3.2 Scapegoat Puzzles
Dawncloud Golden Scapegoat 1
| Dawncloud Golden Scapegoat 1 Solution |
|---|
Input the commands: Left, Down, Left, Right, Right, Right, Right. When your past self shows up, go to the left once and then go right to fall to the bottom level safely. Afterwards, go to the left to reach the altar. |
▲ Back to All Dawncloud Puzzles
Dawncloud Golden Scapegoat 2
| Dawncloud Golden Scapegoat 2 Solution |
|---|
Input the commands: Right, Left, Right, Right, Down, Right, Right. Climb up the ladder as soon as you can and head straight to the yellow door on the left to reach the altar. |
▲ Back to All Dawncloud Puzzles
Dawncloud Golden Scapegoat 3
| Dawncloud Golden Scapegoat 3 Solution |
|---|
Input the commands: Left, Left, Left, Right, Right, Right, Right. Afterwards, go to the right and then left so that your past self can fall down. Repeat the action until your past self goes down to the bottom to press the blue button that leads to the altar. |
▲ Back to All Dawncloud Puzzles
Dragonbone City Styxia
| Dragonbone City Styxia F1 Evernight | Dragonbone City Styxia F1 Dawn |
|---|---|
 |
 |
| Dragonbone City Styxia F2 Dawn | |
 |
|
| Styxia Puzzle Solutions | |
| Puzzle 1 | Puzzle 2 |
| Puzzle 3 | |
Three Golden Scapegoat puzzles can be found in the Dragonbone City of Styxia in Amphoreus. Use the Ancient City Market Space Anchor in F1 and go down the stairs on the left.
Use the Miracle Beacon near the wooden boxes to make a path to the other side. From there, use the Miracle Beacon to the left and you'll be able to interact with the first Golden Scapegoat to the right, next to the big stone.
For the second Golden Scapegoat, teleport to the Ancient City Market Space Anchor and use the Miracle Beacon in front of it. Walk down the stairs and pass through two wooden boxes to get to the other side. Just follow the stairs and you'll see the second scapegoat.
Use the Treasure Vault Secret Passage Space Anchor and head to the big room on the left. At the entrance, you'll see a Miracle Beacon. Use it to get across the other side and go down the stairs. Once you're down the stairs, go to the right and see the scapegoat among the debris.
▲ Back to Version 3.2 Scapegoat Puzzles
Styxia Golden Scapegoat 1
| Styxia Golden Scapegoat 1 Solution |
|---|
Input the commands: Right, Right, Right, Right, Right, Right, Left. When your past self shows up, go down the ladder. Wait for it to get close to the yellow button and go back up, then head right to get to the altar. |
Styxia Golden Scapegoat 2
| Styxia Golden Scapegoat 2 Solution |
|---|
Input the commands: Right, Left, Left, Left, Up, Left, Left. When your past self shows up, just wait for it to step on the yellow button and then go to the altar. |
Styxia Golden Scapegoat 3
| Styxia Golden Scapegoat 3 Solution |
|---|
Input the commands: Right, Down, Right, Down, Left, Left, Left, Left. When your past self shows up, just go back up the ladder and head right to get to the altar. |
Version 3.1 Golden Scapegoat Puzzles
| Version 3.1 Golden Scapegoat Puzzles | |
|---|---|
| "Murmuring Woods" Grove of Epiphany | "Sanctum of Prophecy" Janusopolis |
Click the links to jump to an area's puzzles!
Murmuring Woods Grove of Epiphany Golden Scapegoats
| Murmuring Woods Grove of Epiphany F1 | Murmuring Woods Grove of Epiphany B1 |
|---|---|
 |
 |
| Murmuring Woods Grove of Epiphany F3 | |
 |
|
| Murmuring Woods Puzzle Solutions | |
| Puzzle 1 | Puzzle 2 |
| Puzzle 3 | |
Three Golden Scapegoat puzzles can be found in Murmuring Woods of the Grove of Epiphany in Amphoreus. Use the Woven Trail Space Anchor and cross the gap using Janus' Passage. Go behind the statue to see the first one.
For the second one, use the Library of Philia Space Anchor and head down the elevator on the right. Then, go into the room and solve the Prophecy Tablet by the water to unlock the flower and get to it.
Lastly, use the Dome of Devotion Space Anchor again and follow the path to the big room. Go down to the bottom floor using a flower and solve the Prophecy Tablet. It unlocks a flower, which you can take to get to the third one.
▲ Back to Version 3.1 Scapegoat Puzzles
Murmuring Woods Golden Scapegoat 1
| Murmuring Woods Golden Scapegoat 1 Solution |
|---|
Input the commands: Right, Right, Left, Right. This allows you to jump off and press the yellow button. Move to the right and up the ladder, then fall in the gap again until your past self presses the button. Climb up the ladder and then light up the altar to the right. |
▲ Back to All Murmuring Woods Puzzles
Murmuring Woods Golden Scapegoat 2
| Murmuring Woods Golden Scapegoat 2 Solution |
|---|
Input the commands: Right, Left, Left, Left, Right, Left. Go down the ladder and press the blue button while your past self moves to the blue platform. This makes it fall to the yellow button. After, climb up and then light the altar. |
▲ Back to All Murmuring Woods Puzzles
Murmuring Woods Golden Scapegoat 3
| Murmuring Woods Golden Scapegoat 3 Solution |
|---|
Input the commands: Right, Right, Left, Right, Right, Right. Wait for your past self to get close to the yellow platform then press the yellow button so it falls. Next, simply head down to the blue platform and you'll fall to the altar. |
▲ Back to All Murmuring Woods Puzzles
Sanctum of Prophecy Janusopolis Golden Scapegoats
| Sanctum of Prophecy Janusopolis B2 South | Sanctum of Prophecy Janusopolis B2 Northeast |
|---|---|
 |
 |
| Sanctum of Prophecy Janusopolis F1 | |
 |
|
| Sanctum of Prophecy Puzzle Solutions | |
| Puzzle 1 | Puzzle 2 |
| Puzzle 3 | |
Three Golden Scapegoat puzzles can be found in the Sanctum of Prophecy of Janusopolis in Amphoreus. Use the Worshipper's Footpath Space Anchor and head down the stairs to the left to use the elevator. Use the Hand of Zagreus to destroy the boxes and reveal the first.
Use the Archive of Prophecies Space Anchor and solve the Prophecy Tablet nearby to unlock the door that leads to the second scapegoat.
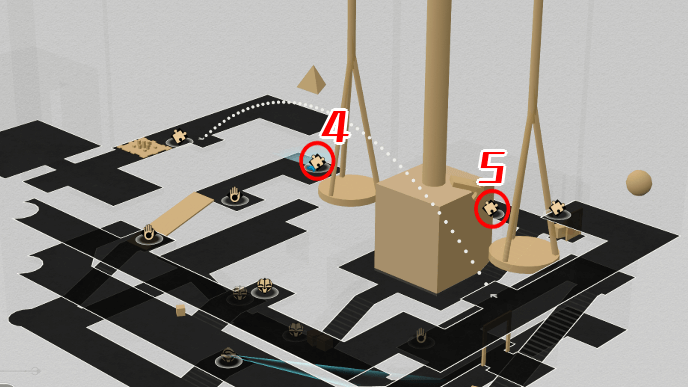
For the third one, use the Destiny's Gate Space Anchor and move forward to the big room with the big scales. Go to the right and there'll be a gap where the scapegoat is.
▲ Back to Version 3.1 Scapegoat Puzzles
Sanctum of Prophecy Golden Scapegoat 1
| Sanctum of Prophecy Golden Scapegoat 1 Solution |
|---|
Input the commands: Right, Right, Down, Left, Left, Left, Left. Wait for your past self to get to the yellow platform before heading up the ladder and pressing the yellow button. You can then go down and then head towards the altar. |
▲ Back to All Sanctum of Prophecy Puzzles
Sanctum of Prophecy Golden Scapegoat 2
| Sanctum of Prophecy Golden Scapegoat 2 Solution |
|---|
Input the commands: Left, Left, Left, Right, Right, Right, Right, Right, Left, Left. Move up and down the ladder after the inputs and wait for your past self to move to the blue button. Go right and you should fall to the platform where the altar is. You can then move left to head to the altar. |
▲ Back to All Sanctum of Prophecy Puzzles
Sanctum of Prophecy Golden Scapegoat 3
| Sanctum of Prophecy Golden Scapegoat 3 Solution |
|---|
Input the commands: Right, Right, Up. Wait for your past self to climb up the ladder after it falls then head up the ladder too. It will fall on the second yellow button which allows you to get to the altar. |
▲ Back to All Sanctum of Prophecy Puzzles
Version 3.0 Golden Scapegoat Puzzles
| Amphoreus Golden Scapegoat Puzzles | |
|---|---|
| "Eternal Holy City" Okhema | "Strife Ruins" Castrum Kremnos |
| "Abyss of Fate" Janusopolis | "Bloodbathed Battlefront" Castrum Kremnos |
Click the links to jump to an area's puzzles!
Eternal Holy City Okhema Golden Scapegoats
| Eternal Holy City Okhema F1 Southwest | Eternal Holy City Okhema F1 Northeast |
|---|---|
 |
 |
| "Eternal Holy City" Okhema Puzzle Solutions | |
| Puzzle 1 | Puzzle 2 |
| Puzzle 3 | Puzzle 4 |
Four Golden Scapegoat puzzles can be found in the Eternal Holy City Okhema of Amphoreus. You can find three of them in the baths area of the city while the other one is near the Marmoreal Market Space Anchor.
▲ Back to Version 3.0 Scapegoat Puzzles
Eternal Holy City Okhema Scapegoat 1
| Okhema City Golden Scapegoat 1 Solution |
|---|
Input the commands: Right, Right. This makes your past self fall down on the button after you climb the ladder. You can then cross the bridge and head towards the torch. |
▲ Back to All Okhema City Puzzles
Eternal Holy City Okhema Scapegoat 2
| Okhema City Golden Scapegoat 2 Solution |
|---|
Input the commands: Right, Right, Left, Right, Left. This makes your past self step on the button so you can cross the bridge and head towards the torch. |
▲ Back to All Okhema City Puzzles
Eternal Holy City Okhema Scapegoat 3
| Okhema City Golden Scapegoat 3 Solution |
|---|
Input the commands: Right, Right. This makes your past self step on the button just after you crossed the bridge. Go back and fall down, then head towards the torch. |
▲ Back to All Okhema City Puzzles
Eternal Holy City Okhema Scapegoat 4
| Okhema City Golden Scapegoat 4 Solution |
|---|
Input the commands: Right, Right, Left, Right. This makes your past self step on the button before the gap and makes the bridge appear. Cross it then head towards the torch. |
▲ Back to All Okhema City Puzzles
Strife Ruins Castrum Kremnos Golden Scapegoats
| Strife Ruins Castrum Kremnos B1 | Strife Ruins Castrum Kremnos F2 |
|---|---|
 |
 |
| Strife Ruins Castrum Kremnos F3 | Strife Ruins Castrum Kremnos B1 Northeast |
 |
 |
| "Strife Ruins" Puzzle Solutions | |
| Puzzle 1 | Puzzle 2 |
| Puzzle 3 | Puzzle 4 |
Four Golden Scapegoat puzzles can be found in Strife Ruins of Castrum Kremnos in Amphoreus. Two of them are in B1 and can easily be found by using the Soulchaser Pass and Soul-Forging Ruins Space Anchors.
The one in F2 is located to the left of the Conquered Outlands Space Anchor. From the Space Anchor, go to the right and head up the stairs to find the one in F3.
▲ Back to Version 3.0 Scapegoat Puzzles
Strife Ruins Golden Scapegoat 1
| Strife Ruins Golden Scapegoat 1 Solution |
|---|
Input the commands: Right, Right, Right, Right. Make your way to the ladder and climb up then cross the bridge to get to the altar. |
▲ Back to All Strife Ruins Puzzles
Strife Ruins Golden Scapegoat 2
| Strife Ruins Golden Scapegoat 2 Solution |
|---|
Input the commands: Right, Down, Right, Right, Right. Make your way to the nearest ladder to avoid your past self and then climb up then cross the bridge to get to the altar. |
▲ Back to All Strife Ruins Puzzles
Strife Ruins Golden Scapegoat 3
| Strife Ruins Golden Scapegoat 3 Solution |
|---|
Input the commands: Left, Right, Right, Right. Hop down on the left and move back and forth until your past self falls on the button then head to the altar. |
▲ Back to All Strife Ruins Puzzles
Strife Ruins Golden Scapegoat 4
| Strife Ruins Golden Scapegoat 4 Solution |
|---|
Input the commands: Right, Up, Right, Up, Right, Up, Right, Right, Right. Move back and forth until your past self drops down on the button. Cross the bridge to reach the altar. |
▲ Back to All Strife Ruins Puzzles
Abyss of Fate Janusopolis Golden Scapegoats
| Abyss of Fate Janusopolis F2 South - Dawn | Abyss of Fate Janusopolis F2 Southeast |
|---|---|
 |
 |
| Abyss of Fate Janusopolis F1 | Abyss of Fate Janusopolis F2 North - Dawn |
 |
 |
| "Abyss of Fate" Janusopolis Puzzle Solutions | |
| Puzzle 1 | Puzzle 2 |
| Puzzle 3 | Puzzle 4 |
| Puzzle 5 | |
Five Golden Scapegoat puzzles can be found in the Abyss of Fate of Janusopolis in Amphoreus. One of them is down the stairs to the left of the Everdream Gate Space Anchor. Another one can be found at the end of the path to the right of the Silent Shroud Space Anchor.
Switch the time to Dawn in the room south of the Silent Shroud Space Anchor to find another one. And finally, there's two puzzles in the room south of the Theophany Chamber Space Anchor.
▲ Back to Version 3.0 Scapegoat Puzzles
Abyss of Fate Golden Scapegoat 1
| Abyss of Fate Golden Scapegoat 1 Solution |
|---|
Input the commands: Right, Right, Right, Right, Right. Go back up the ladder on the left then head to the altar. |
▲ Back to All Abyss of Fate Puzzles
Abyss of Fate Golden Scapegoat 2
| Abyss of Fate Golden Scapegoat 2 Solution |
|---|
Input the commands: Right, Right, Right, Left, Left, Left, Left. Follow your past self to the right and you'll fall through the bridge. Touch the altar on the left to finish the puzzle. |
▲ Back to All Abyss of Fate Puzzles
Abyss of Fate Golden Scapegoat 3
| Abyss of Fate Golden Scapegoat 3 Solution |
|---|
Input the commands: Right, Right, Right, Right, Right, Right. Once your past self is about to fall in the gap, head up the ladder on your left and climb up the other ladder to get to the altar. |
▲ Back to All Abyss of Fate Puzzles
Abyss of Fate Golden Scapegoat 4
| Abyss of Fate Golden Scapegoat 4 Solution |
|---|
Input the commands: Left, Right, Right, Left, Left. Let your past self step on the button by moving up the ladder at the last moment. You can then fall to the altar through the gap. |
▲ Back to All Abyss of Fate Puzzles
Abyss of Fate Golden Scapegoat 5
| Abyss of Fate Golden Scapegoat 5 Solution |
|---|
Input the commands: Right, Right, Right, Right, Right, Right, Right, Right, Left. Continue going to the left to cross the bridges and get to the altar. |
▲ Back to All Abyss of Fate Puzzles
Bloodbathed Battlefront Castrum Kremnos Golden Scapegoats
| Bloodbathed Battlefront Castrum Kremnos F2 Southwest | Bloodbathed Battlefront Castrum Kremnos F2 Northeast |
|---|---|
 |
 |
| Bloodbathed Battlefront Castrum Kremnos B1 | |
 |
|
| Bloodbathed Battlefront Puzzle Solutions | |
| Puzzle 1 | Puzzle 2 |
| Puzzle 3 | |
Three Golden Scapegoat puzzles can be found in Bloodbathed Battlefront of Castrum Kremnos in Amphoreus. Climb the stairs to the left of the Hall of Strife Space Anchor for the first one.
For the second one, go up the stairs to the right of the Soul-Forging Gate Space Anchor and cross the bridge at the end. For the third one, head down the elevator to B1 and you'll find it when you head north.
▲ Back to Version 3.0 Scapegoat Puzzles
Bloodbathed Battlefront Golden Scapegoat 1
| Bloodbathed Battlefront Golden Scapegoat 1 Solution |
|---|
Input the commands: Left, Right, Right, Down, Right. This allows you to jump off and press the yellow button which makes your past self fall through the gap. Your past self will then make its way to the blue button, which allows you to fall through and light up the altar. |
▲ Back to All Bloodbathed Battlefront Puzzles
Bloodbathed Battlefront Golden Scapegoat 2
| Bloodbathed Battlefront Golden Scapegoat 2 Solution |
|---|
Input the commands: Left, Right, Right, Right, Right, Right. Now, go down the ladder then up to avoid your past self. Jump down the button so your past self falls and presses the other button, then make your way to the altar. |
▲ Back to All Bloodbathed Battlefront Puzzles
Bloodbathed Battlefront Golden Scapegoat 3
| Bloodbathed Battlefront Golden Scapegoat 3 Solution |
|---|
Input the commands: Right, Right, Down, Right, Right. Go up the ladder and cross the bridges to reach the altar. |
▲ Back to All Bloodbathed Battlefront Puzzles
Golden Scapegoat Information
Light Up Altars on Platform
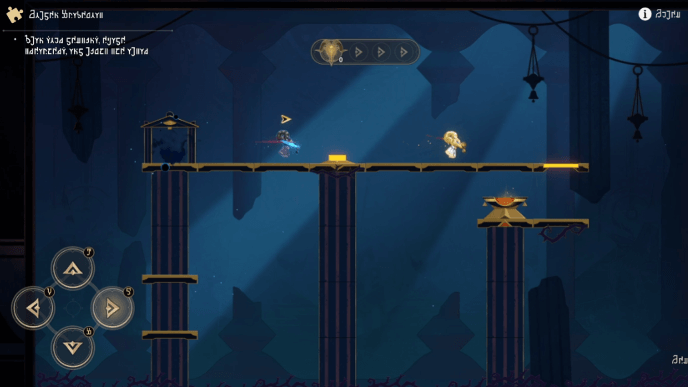
In Golden Scapegoat puzzles, the goal is to help the lamb light all the altars along the platforms. After a certain number of steps, an avatar of darkness will appear and mimic the actions you've taken. Plan your moves carefully to avoid being captured by the darkness!
Get Golden Remains as Reward
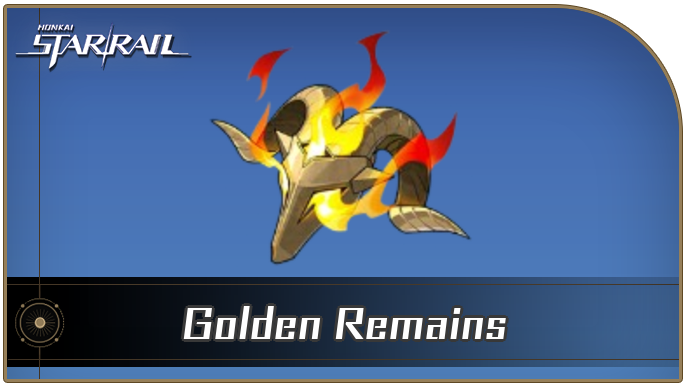
Solving Golden Scapegoat puzzles reward you with Golden Remains which are tracked by the Golden Scapegoat Adventure Mission! The items are currently used as a tracker only but it may have a purpose in the future once more Golden Scapegoats are added.
Honkai: Star Rail Related Guides

All Tips and Tricks Guides
Comment
MOST OF THE TEXT EXPLANATIONS DO NOT WORK AND THE VIDEO INTEGRATIONS ARE TERRIBLE: WHY DO THEY OPEN IN NEW PAGES WHEN WE CLICK ON THEM THIS IS RIDICULOUS
Author

All Golden Scapegoat Puzzle Solutions and Locations
Rankings
- We could not find the message board you were looking for.
Gaming News

![Ratatan Review [Early Access] | Hits the Right Beats](https://img.game8.co/4283109/ed5a8963f67e4cb2e6a83fd4232e3290.jpeg/thumb)


Popular Games

Genshin Impact Walkthrough & Guides Wiki
Hollow Knight: Silksong Walkthrough & Guides Wiki
Umamusume: Pretty Derby Walkthrough & Guides Wiki
Borderlands 4 Walkthrough & Guides Wiki
Wuthering Waves Walkthrough & Guides Wiki
Honkai: Star Rail Walkthrough & Guides Wiki
Pokemon TCG Pocket (PTCGP) Strategies & Guides Wiki
Pokemon Scarlet and Violet (SV) Walkthrough & Guides Wiki
Zenless Zone Zero Walkthrough & Guides Wiki
Clair Obscur: Expedition 33 Walkthrough & Guides Wiki


Recommended Games
Yu-Gi-Oh! Master Duel Walkthrough & Guides Wiki
Once Human Walkthrough & Guides Wiki
Fire Emblem Heroes (FEH) Walkthrough & Guides Wiki
Persona 3 Reload Walkthrough & Guides Wiki
Black Myth: Wukong Walkthrough & Guides Wiki
The Legend of Zelda: Tears of the Kingdom Walkthrough & Guides Wiki
Super Smash Bros. Ultimate Walkthrough & Guides Wiki
Monster Hunter World Walkthrough & Guides Wiki
Diablo 4: Vessel of Hatred Walkthrough & Guides Wiki
Elden Ring Shadow of the Erdtree Walkthrough & Guides Wiki


All rights reserved
Copyright © 2024 HoYoverse, COGNOSPHERE. All Rights Reserved.
The copyrights of videos of games used in our content and other intellectual property rights belong to the provider of the game.
The contents we provide on this site were created personally by members of the Game8 editorial department.
We refuse the right to reuse or repost content taken without our permission such as data or images to other sites.
Cloudedge Bastion Ruins Golden Scapegoat 2 text Solution is incorrect. You have to go to the left after the inputs, not right.