El Condor Pasa (Monk) Build Guide and Character Info
★ Best Characters | Best Support | Best Skills
┗ New Character: Seiun Sky | Hishi Amazon
┗ New Cards: Bamboo Memory | Shinko Windy
★ Event Choice Checker
★ Support Comparison Tool
★ Friend ID Sharing Board
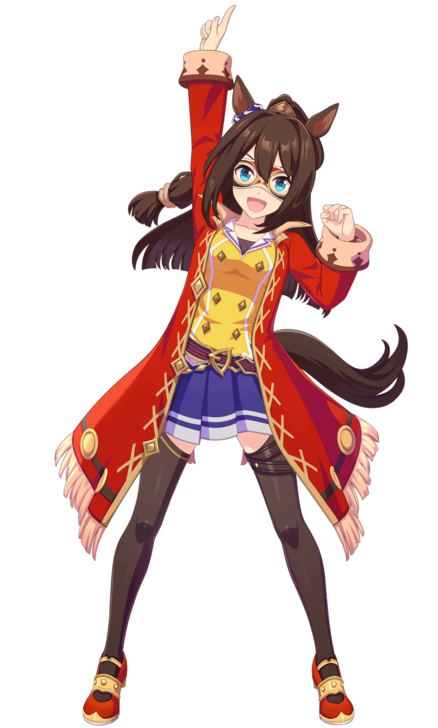
El Condor Pasa (Monk) is an upcoming character (trainee) in Umamusume: Pretty Derby. Get an early peak of El Condor Pasa (Monk), their stats, and how to build them here.
| El Condor Pasa Related Guides | |
|---|---|
|
|
|
List of Contents
| This is an upcoming character, and not all information or official translations have been released yet. |
El Condor Pasa (Monk) Character Info
El Condor Pasa (Monk) Stats
| El Condor Pasa (Monk) | |||||||||||||||||||
|---|---|---|---|---|---|---|---|---|---|---|---|---|---|---|---|---|---|---|---|

|
|||||||||||||||||||
| Overall | Ease | T. Trials | CM | ||||||||||||||||
| ー | ー | ー | ー | ||||||||||||||||
| Track Aptitude | |||||||||||||||||||
| Turf: A | Dirt: B | ||||||||||||||||||
| Distance Aptitude | |||||||||||||||||||
| Sprint: F | Mile: A | Med: A | Long: B | ||||||||||||||||
| Pace Aptitude | |||||||||||||||||||
| Front: E | Pace: A | Late: A | End: C | ||||||||||||||||
| Stat Growth | |||||||||||||||||||
| SPD: 15% | STA: 0% | POW: 0% | GUT: 15% | WIT: 0% | |||||||||||||||
El Condor Pasa (Monk) Unique Skill
|
|
When aiming to move from the middle to the front in the final corner, let your soul burn and increase your acceleration. |
|---|
El Condor Pasa (Monk) Innate Skills
| All Innate Skills |
|---|
El Condor Pasa (Monk) Potential Skills
| Skill Per Potential Level |
|---|
| Potential 2: Potential 3: Potential 4: Potential 5: |
Upcoming Spotlight Scout
El Condor Pasa (Monk) will be a featured character for an upcoming Spotlight Pretty Derby Scout Banner, which is available from September 21 to October 4, 2025.
Make sure to save up enough Carats if you want to pull for El Condor Pasa (Monk). If you haven't decided on it yet, consider checking our guide on which Banners you should pull.
Upcoming Characters and Support Cards
Is El Condor Pasa (Monk) Worth It?
Pull for a Decent Late Surger
El Condor Pasa (Monk) has access to numerous strong Late Surger skills, including her own Unique Skill. As such, pull for El Condor Pasa (Monk) if you want a decent Late Surger. You can also roll for her if you want to transfer her Unique skill to other Late Surgers via Legacy.
El Condor Pasa and Grass Wonder (Fantasy) Banner Release Date
El Condor Pasa (Monk) Career Training Tips
| Training Tips |
|---|
|
|
Run Her As A Late Surger
El Condor Pasa (Monk) is primarily a Late Surger, compared to her original version, who is primarily a Pace Chaser.
As a Late Surger, El Condor Pasa (Monk) can take advantage of her innate skill Outer Swell (as well as its upgraded version Rising Dragon via Potential). Additionally, the running style synergizes with her Unique Skill Condor Savage Wave, which requires her to be in the middle of the pack. This condition can easily be met while running as a Late Surger.
To help her run in this style, make sure to improve her Late Surger aptitude from A to S using Legacies.
Prioritize Speed And Power
As a Late Surger, El Condor Pasa (Monk) will need Speed and Power to allow her to overtake her opponents and catch up to the front of the race. Having high Speed boosts her top speed, while having high Power improves her acceleration.
Of course, this doesn't mean that you should neglect Stamina, as she needs to win the Arima Kinen in her career. Getting her Stamina to 700 for the Senior Year should be enough, especially with Recovery skills.
Increase Her Potential Level
It is important to get El Condor Pasa (Monk)'s Potential level to the max level as this unlocks Rising Dragon, a direct upgrade of Outer Swell. If you do not have the resources for it, however, then try to get it to at least Level 3 so you can get access to the skill Furious Feat.
Improve Her Long Aptitude
El Condor Pasa (Monk)'s career consists mostly of Mile and Medium races. However, she has to run the Arima Kinen, a Long race, during her Senior Year. As such, try to upgrade her Long aptitude to A using Legacies to improve your chances of clearing her scenario.
Get Dirt And Mile Sparks For Team Trials
For Team Trials, we highly recommend improving her Dirt and Mile aptitudes using Legacies, as she can serve as one of your Dirt runners alongside Haru Urara, Oguri Cap, and Smart Falcon.
El Condor Pasa (Monk) Build
Recommended Stats
| 1000 | 700 | 800 | 300 | 400 |
El Condor Pasa (Monk) is a Late Surger version of the original. As such, she will need more Power than her original counterpart to help her in overtaking other racers. Prioritize Speed and Power first, then put everything else into Stamina. Increase her Guts and Wit when able, with a focus on Wit to help El Condor Pasa (Monk) activate her skills.
It is important to note that if you cannot reach the stats recommended above, you can instead aim for a similar stat distribution. You can then compensate for the missing stats using skills. Additionally, if you are only planning on clearing a career run with El Condor Pasa (Monk), then you can aim for lower stat numbers, as the stats above are a baseline for Team Trials.
Recommended Support Cards
 Oguri Cap (Get Lots of Hugs for Me)
 Eishin Flash (5:00 a.m.-Right on Schedule)
 Sweep Tosho (Lamplit Training of a Witch-to-be)
 Kitasan Black (Fire at My Heels)
 Super Creek (Piece of Mind)
 Mayano Top Gun (Cute + Cute = ?)
We recommend a 3 Speed, 2 Stamina, and 1 Power deck, which should give El Condor Pasa (Monk) the stats she needs for her races. You can also choose to replace one of the Stamina cards with a Power card if you are having a hard time increasing her Power during careers.
Not only do these cards help El Condor Pasa (Monk) level her needed Stats (especially with Rainbow/Friendship Training), but they also provide some needed skills like Swinging Maestro and Professor of Curvature.
Alternate SR Support Cards
| Alternate Cards | ||
|---|---|---|
 King Halo (First-Rate Plan) King Halo (First-Rate Plan) Rarity: SR Type: Speed Speed Special Priority and Homestretch Haste |
 Shinko Windy (///WARNING GATE///) Shinko Windy (///WARNING GATE///) Rarity: SR Type: Speed Speed Special Priority and some usable Mile skills |
 Zenno Rob Roy (The Perfect Book for You) Zenno Rob Roy (The Perfect Book for You) Rarity: SR Type: Stamina Stamina Special Priority and some usable Speed skills |
If you do not have the cards from the recommended deck, you can replace them with a similar stat card that provides skills that El Condot Pasa (Monk) needs. These can be SSR cards or even SR cards. Above are some of the SR cards that you can use in place of SSR Support cards.
Recommended Legacy Sparks
| Recommended | |
|---|---|
| 9★ Speed 9★ Power |
|
| 3★ Front Runner 3★ Mile 3★ Long 3★ Dirt |
For Legacy Sparks, we recommend trying to find Speed and Power sparks to help with El Condor Pasa (Monk)'s races, as she will need the Speed and Power as a Late Surger. For race length Sparks, get enough Long Sparks to get her Long aptitude to A, then focus on getting her Mile Aptitude to A with Mile Sparks.
For running style, Late Surger sparks are the best choice, as you will be running El Condor Pasa (Monk) as a Late Surger. This gives her access to strong skills like Rising Dragon.
You can use either your own Veterans, or borrow the ones from your friends. If you do not have Veterans with full sparks, you can go with whatever you have access to.
Legacy Compatibility
| Great | |
|---|---|
| Good |
When picking Legacies, try to select compatible legacies, as they increase the chance of inheriting additional sparks during the Inheritance events. This is not required, but is highly recommended.
If you do not have access to fully compatible legacies, it is enough to ensure that you have at least good compatibility with your selected legacies.
Recommended Skills
| Recommended Skills | ||
|---|---|---|
 Straightaway Recovery Straightaway Recovery
|
 Swinging Maestro Swinging Maestro
|
 Professor of Curvature Professor of Curvature
|
 Furious Feat Furious Feat
|
 Homestretch Haste Homestretch Haste
|
Ramp Up
|
|
Rising Dragon
|
 Fighter Fighter
|
1,500,000 CC
|
Late Surgers need both speed and acceleration skills, and El Condor Pasa (Monk) is no exception. Rising Dragon and Ramp Up are both speed skills that will help El Condor Pasa (Monk) pick up speed while overtaking, while Fighter and Furious Feat will both help her accelerate during the race.
Professor of Curvature and 1,500,000 CC will both provide speed during the race, while Homestretch Haste will provide the last boost of speed she needs. Swinging Maestro and Straightaway Recovery are both good skills that can help her recover her stamina during the race.
If you cannot get the recommended skills, you can replace them with similar skills that you have access to. You will just need to make sure that El Condor Pasa (Monk) can activate said skills in a race.
El Condor Pasa (Monk) Events
Cactus Feast
| Choice | Outcome |
|---|---|
| Choice 1 |
・ 10 Speed ・ 10 Stamina |
| Choice 2 | ・ 20 Wit |
Determination of the World's Strongest
| Choice | Outcome |
|---|---|
|
Choice 1
(Let's beat all your rivals!) |
・ 20 Power |
|
Choice 2
(Like your determination to achieve all your dreams?) |
・ 20 Stamina |
Song of Courage
| Choice | Outcome |
|---|---|
|
Choice 1
(What about one of the winning concert songs?) |
・ 20 Power ・ Fast Learner (Random) |
|
Choice 2
(What if she had a cheerleading squad?) |
・ 10 Speed ・ 10 Power ・ Fast Learner (Random) |
Flower Language
| Choice | Outcome |
|---|---|
|
Choice 1
(How about chamomiles?) |
・ 1 Mood ・ 5 Wit |
|
Choice 2
(How about baby's breath?) |
・ 10 Energy |
Renewed Resolve
| Choice | Outcome |
|---|---|
| Choice 1 | ・ 10 Guts |
| Choice 2 | ・ 10 Stamina |
| Choice 3 |
・ 5 Speed ・ 5 Stamina |
Shocking Retirement
| Choice | Outcome |
|---|---|
| Choice 1 | ・ 10 Guts |
| Choice 2 | ・ 10 Power |
The Academy at Night
| Choice | Outcome |
|---|---|
|
Choice 1
(You're the world's strongest and the world's fastest!) |
・ 1 Mood ・ 5 Guts |
|
Choice 2
(Look out behind you! He's got an axe!) |
・ 10 Energy |
The Wrestler I Admire
| Choice | Outcome |
|---|---|
| Choice 1 | ・ 10 Stamina |
| Choice 2 | ・ 10 Speed |
A Personalized Mask
| Choice | Outcome |
|---|---|
|
Choice 1
(Maybe a cheetah, for speed?) |
・ 10 Speed |
|
Choice 2
(What about an elephant, for strength?) |
・ 10 Power |
Dance Lesson (El Condor Pasa)
| Choice | Outcome |
|---|---|
|
Choice 1
(Let's dance somewhere where you can keep an eye on your surroundings.) |
・ 10 Stamina |
|
Choice 2
(You should try dancing while looking in a mirror.) |
・ 10 Wit |
Go for the Extra-Large Pizza!
| Choice | Outcome |
|---|---|
|
Choice 1
(Just stroll up like you own the place!) |
・ 10 Power ・ 15 Skill Pts |
|
Choice 2
(Look for a gap in the crowd!) |
・ Soft Step Skill Hint |
Hot and Spicy!
| Choice | Outcome |
|---|---|
|
Choice 1
(Isn't it a waste to use it all up at once?) |
・ 10 Energy ・ 5 Skill Pts |
|
Choice 2
(Success)
(Eat up and get stronger!) |
・ 30 Energy ・ 10 Skill Pts |
|
Choice 2
(Fail)
(Eat up and get stronger!) |
・ 30 Energy ・ -5 Speed ・ 5 Power ・ 10 Skill Pts ・ Slow Metabolism |
Salsa Roja
| Choice | Outcome |
|---|---|
|
Choice 1
(Sounds pretty spicy.) |
・ 10 Stamina |
|
Choice 2
(It's got a very powerful ring to it.) |
・ 10 Power |
At Summer Camp (Year 2) (El Condor Pasa)
| Choice | Outcome |
|---|---|
|
Choice 1
(Piercing force.) |
・ 10 Power |
|
Choice 2
(A taciturn nature.) |
・ 10 Guts |
New Year's Resolutions (El Condor Pasa)
| Choice | Outcome |
|---|---|
|
Choice 1
(Throws.) |
・ 10 Power |
|
Choice 2
(Sleeper holds.) |
・ 20 Energy |
|
Choice 3
(Tag team tactics.) |
・ 20 Skill Pts |
New Year's Shrine Visit (El Condor Pasa)
| Choice | Outcome |
|---|---|
|
Choice 1
(Special Week.) |
・ 30 Energy |
|
Choice 2
(Silence Suzuka.) |
・ 5 All Stats |
|
Choice 3
(Grass Wonder.) |
・ 35 Skill Pts |
Don't Over Do it! (El Condor Pasa)
| Choice | Outcome |
|---|---|
| Choice 1 |
・ 10 Energy ・ -2 Mood ・ Last trained stat and two other random stat -10 ・ Practice Poor (random) |
| Choice 2 (Success) | ・ Practice Perfect ◯ |
| Choice 2 (Fail) |
・ -3 Mood ・ 3 Random stat -10 ・ Practice Poor |
Extra Training (El Condor Pasa)
| Choice | Outcome |
|---|---|
|
Choice 1
(When you've put it like that, I've got to join you!) |
・ -5 Energy ・ Last trained stat +5 ・ 5 Friendship with Director |
|
Choice 2
(In that case, you should get some rest.) |
・ 5 Energy |
Get Well Soon! (El Condor Pasa)
| Choice | Outcome |
|---|---|
| Choice 1 |
・ -1 Mood ・ Last trained stat -5 ・ Practice Poor (random) |
| Choice 2 (Success) | ・ Practice Perfect ◯ |
| Choice 2 (Fail) |
・ -1 Mood ・ Last trained stat -10 ・ Practice Poor (random) |
Defeat (G1) (El Condor Pasa)
| Choice | Outcome |
|---|---|
| Choice 1 |
・ -25 Energy ・ 25 Skill Pts ・ Random Stat +4 |
| Choice 2 (Success) |
・ -15 Energy ・ 25 Skill Pts ・ Random Stat +4 |
| Choice 2 (Fail) |
・ -35 Energy ・ 25 Skill Pts ・ Random Stat +4 |
Defeat (G2) (El Condor Pasa)
| Choice | Outcome |
|---|---|
| Choice 1 |
・ -25 Energy ・ 20 Skill Pts ・ Random Stat +3 |
| Choice 2 (Success) |
・ -15 Energy ・ 20 Skill Pts ・ Random Stat +3 |
| Choice 2 (Fail) |
・ -35 Energy ・ 20 Skill Pts ・ Random Stat +3 |
Defeat (G3) (El Condor Pasa)
| Choice | Outcome |
|---|---|
| Choice 1 |
・ -25 Energy ・ 20 Skill Pts ・ Random Stat +3 |
| Choice 2 (Success) |
・ -15 Energy ・ 20 Skill Pts ・ Random Stat +3 |
| Choice 2 (Fail) |
・ -35 Energy ・ 20 Skill Pts ・ Random Stat +3 |
Defeat (OP and Pre-OP) (El Condor Pasa)
| Choice | Outcome |
|---|---|
| Choice 1 |
・ -25 Energy ・ 10 Skill Pts |
| Choice 2 (Success) |
・ -15 Energy ・ 10 Skill Pts |
| Choice 2 (Fail) |
・ -35 Energy ・ 10 Skill Pts |
Solid Showing (G1) (El Condor Pasa)
| Choice | Outcome |
|---|---|
| Choice 1 |
・ -20 Energy ・ 45 Skill Pts ・ Random Stat +8 |
| Choice 2 (Success) |
・ -10 Energy ・ 45 Skill Pts ・ Random Stat +8 |
| Choice 2 (Fail) |
・ -30 Energy ・ 45 Skill Pts ・ Random Stat +8 |
Solid Showing (G2) (El Condor Pasa)
| Choice | Outcome |
|---|---|
| Choice 1 |
・ -20 Energy ・ 35 Skill Pts ・ Random Stat +5 |
| Choice 2 (Success) |
・ -10 Energy ・ 35 Skill Pts ・ Random Stat +5 |
| Choice 2 (Fail) |
・ -30 Energy ・ 35 Skill Pts ・ Random Stat +5 |
Solid Showing (G3) (El Condor Pasa)
| Choice | Outcome |
|---|---|
| Choice 1 |
・ -20 Energy ・ 35 Skill Pts ・ Random Stat +5 |
| Choice 2 (Success) |
・ -10 Energy ・ 35 Skill Pts ・ Random Stat +5 |
| Choice 2 (Fail) |
・ -30 Energy ・ 35 Skill Pts ・ Random Stat +5 |
Solid Showing (OP and Pre-OP) (El Condor Pasa)
| Choice | Outcome |
|---|---|
| Choice 1 |
・ -20 Energy ・ 30 Skill Pts ・ Random Stat +3 |
| Choice 2 (Success) |
・ -10 Energy ・ 30 Skill Pts ・ Random Stat +3 |
| Choice 2 (Fail) |
・ -30 Energy ・ 30 Skill Pts ・ Random Stat +3 |
Victory! (G1) (El Condor Pasa)
| Choice | Outcome |
|---|---|
| Choice 1 |
・ -15 Energy ・ 45 Skill Pts ・ Random Stat +10 |
| Choice 2 (Success) |
・ -5 Energy ・ 45 Skill Pts ・ Random Stat +10 |
| Choice 2 (Fail) |
・ -20 Energy ・ 45 Skill Pts ・ Random Stat +10 |
Victory! (G2) (El Condor Pasa)
| Choice | Outcome |
|---|---|
| Choice 1 |
・ -15 Energy ・ 35 Skill Pts ・ Random Stat +8 |
| Choice 2 (Success) |
・ -5 Energy ・ 35 Skill Pts ・ Random Stat +8 |
| Choice 2 (Fail) |
・ -20 Energy ・ 35 Skill Pts ・ Random Stat +8 |
Victory! (G3) (El Condor Pasa)
| Choice | Outcome |
|---|---|
| Choice 1 |
・ -15 Energy ・ 35 Skill Pts ・ Random Stat +8 |
| Choice 2 (Success) |
・ -5 Energy ・ 35 Skill Pts ・ Random Stat +8 |
| Choice 2 (Fail) |
・ -20 Energy ・ 35 Skill Pts ・ Random Stat +8 |
Victory! (OP and Pre-OP) (El Condor Pasa)
| Choice | Outcome |
|---|---|
| Choice 1 |
・ -15 Energy ・ 30 Skill Pts ・ Random Stat +5 |
| Choice 2 (Success) |
・ -5 Energy ・ 30 Skill Pts ・ Random Stat +5 |
| Choice 2 (Fail) |
・ -20 Energy ・ 30 Skill Pts ・ Random Stat +5 |
El Condor Pasa Career Goals
| Goal | Race/Goal |
|---|---|
| Run in Junior Make Debut | Junior Make Debut |
| Place top 5 in Kyodo New Hai |
 Kyodo News Hai Kyodo News Hai
(Mile - 1800m) Classic Year Early Feb |
| Place top 5 in NHK Mile C. |
 NHK Mile Cup NHK Mile Cup
(Mile - 1600m) Classic Year Early May |
| Place top 5 in Japenese Derby |
 Japanese Derby (Tokyo Yushun) Japanese Derby (Tokyo Yushun)
(Medium - 2400m) Classic Year Late May |
| Place top 3 in Mainichi Okan |
 Mainichi Okan Mainichi Okan
(Mile - 1800m) Classic Year Early Oct |
| Place 1st in Takarazuka Kinen |
 Takarazuka Kinen Takarazuka Kinen
(Medium - 2200m) Senior Year Late Jun |
| Place 1st in Japan C. |
 Japan Cup Japan Cup
(Medium - 2400m) Senior Year Late Nov |
| Place 1st in Arima Kinen |
 Arima Kinen Arima Kinen
(Long - 2500m) Senior Year Late Dec |
El Condor Pasa Profile
Basic Information
 El Condor Pasa El Condor Pasa"Soaring towards victory with the heart of a wrestler! El's the world's strooongest!" | Voice Actress | Minami Takahashi |
|---|---|---|
| Height | 163cm / 5'4" | |
| Weight | Slight increase (the weightlifting's working!) | |
| Birthday | Mar 17 | |
| Three Sizes | B 89 | W 58 | H 86 | |
| A masked luchadora, she's always hyped up and ready to wrestle. She has ultimate confidence that she's the world's strongest Umamusume, and loves to proclaim that fact to anyone who'll lend her an ear. Her mask is a present from her pro wrestler father and she insists on keeping it on at all times—no matter what. Her best friend and roommate, Grass Wonder, constantly scolds her for being too reckless. | ||
Costumes
| Uniform | Racewear |
|---|---|
 |
 El Numero 1 El Numero 1 |
Umamusume: Pretty Derby Related Guides

Character Guides
| Height and Weight | Voice Actors | Three Sizes | List of Birthdays |
Characters (Trainees) by Rarity
| 3-Star Characters | 2-Star Characters | 1-Star Characters |
Current Uma Musume Characters (Trainees)
 Grass Wonder (Healer)
 Hishi Amazon (Azure Amazon)
 Seiun Sky (Reeling in the Big One)
 Air Groove (Quercus Civilis)
 Mayano Top Gun (Sunlight Bouquet)
 Narita Brian (Maverick)
 Smart Falcon (LOVE☆4EVER)
 Narita Taishin (Nevertheless)
 Curren Chan (Fille Éclair)
 Tokai Teio (Beyond the Horizon)
 Mejiro McQueen (End of the Skies)
 Biwa Hayahide (pf. Winning Equation...)
 Mihono Bourbon (MB-19890425)
 T.M. Opera O (O Sole Suo!)
 Rice Shower (Rosy Dreams)
 Symboli Rudolf (Emperor's Path)
 Mejiro McQueen (Frontline Elegance)
 Taiki Shuttle (Wild Frontier)
 Oguri Cap (Starlight Beat)
 Maruzensky (Formula R)
 Tokai Teio (Peak Joy)
 Silence Suzuka (Innocent Silence)
 Special Week (Special Dreamer)
 Super Creek (Murmuring Stream)
 Mayano Top Gun (Scramble Zone)
 Air Groove (Empress Road)
 El Condor Pasa (El Numero 1)
 Grass Wonder (Stone-Piercing Blue)
 Daiwa Scarlet (Peak Blue)
 Vodka (Wild Top Gear)
 Gold Ship (Red Strife)
 King Halo (King of Emeralds)
 Nice Nature (Poinsettia Ribbon)
 Matikane Fukukitaru (Rising Fortune)
 Haru Urara (Bestest Prize)
 Sakura Bakushin O (Blossom in Learning)
 Winning Ticket (Get to Winning!)
 Agnes Tachyon (Tach-nology)
 Mejiro Ryan (Down the Line)
Comment
Author

El Condor Pasa (Monk) Build Guide and Character Info
Rankings
- We could not find the message board you were looking for.
Gaming News


Popular Games

Genshin Impact Walkthrough & Guides Wiki
Hollow Knight: Silksong Walkthrough & Guides Wiki
Umamusume: Pretty Derby Walkthrough & Guides Wiki
Borderlands 4 Walkthrough & Guides Wiki
Wuthering Waves Walkthrough & Guides Wiki
Honkai: Star Rail Walkthrough & Guides Wiki
Pokemon TCG Pocket (PTCGP) Strategies & Guides Wiki
Pokemon Scarlet and Violet (SV) Walkthrough & Guides Wiki
Zenless Zone Zero Walkthrough & Guides Wiki
Clair Obscur: Expedition 33 Walkthrough & Guides Wiki


Recommended Games
Fire Emblem Heroes (FEH) Walkthrough & Guides Wiki
Yu-Gi-Oh! Master Duel Walkthrough & Guides Wiki
Persona 3 Reload Walkthrough & Guides Wiki
Once Human Walkthrough & Guides Wiki
Black Myth: Wukong Walkthrough & Guides Wiki
The Legend of Zelda: Tears of the Kingdom Walkthrough & Guides Wiki
Super Smash Bros. Ultimate Walkthrough & Guides Wiki
Monster Hunter World Walkthrough & Guides Wiki
Diablo 4: Vessel of Hatred Walkthrough & Guides Wiki
Elden Ring Shadow of the Erdtree Walkthrough & Guides Wiki


All rights reserved
© Cygames, Inc.
The copyrights of videos of games used in our content and other intellectual property rights belong to the provider of the game.
The contents we provide on this site were created personally by members of the Game8 editorial department.
We refuse the right to reuse or repost content taken without our permission such as data or images to other sites.